Thursday, September 30, 2010

Felt Pillow: Bats

I've made something SPOOKY!

I found this cute batty felt pillow tutorial, and just couldn't resist.

I did do a couple of things differently than the tutorial.

1. my pillow is actually a slipcover with an 18 x 18 inch down/feather insert.
2. instead of cutting the bats from a pattern, I used a bat die-cut.

So what do you think? What fun things are you making for Halloween?


just for fun: can you spot the baby?


Monday, July 12, 2010

Lavandula, my sweet

These plants are some of my very favorite in our yard. They have grown extremely well in the sandy soil and hot, dry heat. The bees seem to really enjoy the lavender as well.


I found this sachet tutorial a year ago and made some of them up for teacher Christmas gifts. Now that the lavender and bees are out again, I wanted to make some up again!


It's always nice to have something pretty and sweet every now and again. So go ahead and make a few for yourself!

Tuesday, June 29, 2010

my creative best. times five.

Saturday, May 29, 2010

Market Bag::Teacher Gifts

It is the end of the school year. And that means time for teacher gifts!

This year I made bags for all three teachers. I love these bags! They are so handy for carrying all sorts of things. And they are pretty easy to make as well.

Friday, May 14, 2010

Blessing Baby Slippers


For the baby's blessing, I wanted to make something...It started out that I wanted to make the dress, but that didn't happen.

So I ended up crocheting her baby slippers. (i'm calling them slippers instead of booties because that sounds so much more feminine! and aren't they SO feminine?)

I bought the pattern from this etsy shop. I changed it around a bit to look more like the slippers I'd seen at this etsy shopThe slippers were still a little big, even after I used a smaller hook, but I think they turned out beautifully. The little flower adds just the right touch!

Friday, May 7, 2010

Patriotic Ruffle Wreath

A month ago, I came across this tutorial for a ruffled wreath. I thought it looked really cute and wanted to give it a try. I love the ruffles!


A good opportunity came up when I needed a little something for a craft night. The theme: PATRIOTIC. I used blue and white toile fabric that I already had. I wanted to make rosettes for the needed red. So I made three from some fabric strips my mom gave me. They're inspired by this tutorial.


(i've got to say... i'm really loving ruffles. i think i want to try some throw pillows. i may be investing in a ruffle foot for my sewing machine. also, i definitely want to make some more of the rosettes.)

Monday, May 3, 2010

Paper Airplane Tutorial


When Isaac was little I checked a book out from the library on how to make paper airplanes. I never imagined that those ariplanes would become a such a part of our lives! Isaac still likes paper airplanes. Although now he can make his own. Right now, it's Asher's turn.
I know how to make two basic airplanes. I'm going to share my favorite one.


See that last picture? He crumpled it up in the time it took me to change a load of laundry from the washer to the dryer.

Tissue Paper Flower Tutorial

The birthday decorations have finally, FINALLY come down. They've been up since the end of March. MARCH. First for Aryn and then for Zoe. I have to admit though, I liked having them up. They're so pretty and added fun color to the kitchen.

These paper flowers are great decorations that can be used for so many different occasions... birthdays, baby showers, bridal showers, etc. They're very versatile, easy to make, and look beautiful!!

My mom has made them a lot for different things, so she came over and showed me how to make them. Let me show YOU how it's done...

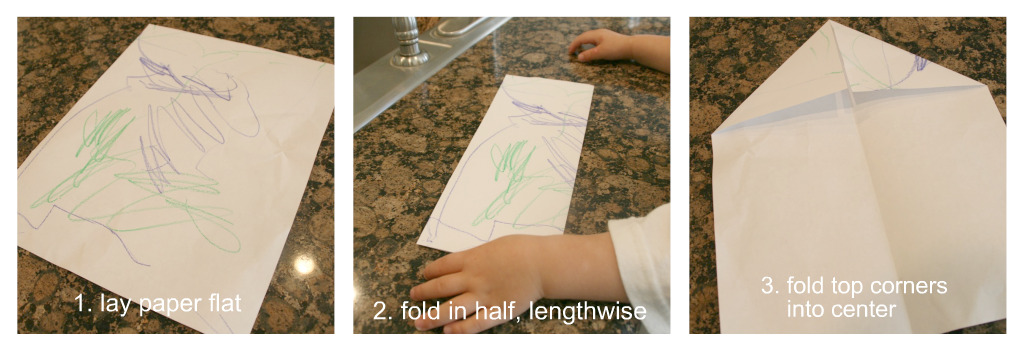
You will need: tissue paper, scissors, garbage ties or wire, yarn.

You can use 6 or 8 sheets of tissue paper.
Decide on the size of flower you want. Small-cut the tissue paper in half. Medium-cut some of the top off. Large-use the full size.
Fold the paper back and forth into an accordion fan.
Cut the ends on both sides into either a rounded shape or a point (like the white).

Twist the garbage tie or wire around the middle of the accordion fan.

Very carefully, pull the sheets of tissue paper apart individually toward the wired center. Go slowly because the paper rips VERY easily. Make sure to do this to both sides.

Voila! A beautiful paper peony.
Make a bunch of different colors and sizes, tie on some yarn, and hang them from your ceiling. (I'm thinking of hanging ours back up in the girls' room.)

Note: this post was first published here by me under the title: paper peonies.

Wednesday, April 28, 2010

Patchwork Project (part 3)

It's all in the details.

I find that with so many things, the little added touches...the details, really do make a difference!

In order to make the new carseat cover removable (and washable), I had to cut slits to allow for the seatbelt straps. To keep the edges from coming apart I sewed around where the slits would be cut. I also added buttonholes down the sides.

I made some "laces" out of polka dot fabric to keep the carseat cover sides together. I thought bows tied at the bottom would be a cute little detail.

Another detail I thought would be nice to have was seatbelt strap covers. I found this tutorial that suggested using potholders. Since I wanted everything to match, I traced the potholder onto my quilt fabric, cut it out, and added double folded bias tape and velcro.


Finally, this project is complete!

Wednesday, April 21, 2010

Reversible Table Runner with Ruffled Trim

I decided to use some fabric from my stash to make a table runner for our entry table. I've seen a couple of patterns (here and here) that got me motivated enough to make my own. (go here to make the paper bag mushrooms. easy and fun.)
I decided to use fabrics that match the curtains in the living room and kitchen. The curtains in the living room are reversible (i turn them over every six months). The curtains in the kitchen aren't reversible...yet.

One side of the runner is a variety of different strips of fabric that matches both sides of the living room curtains.

And the other side is solid green fabric, like the kitchen.

I wanted to add a ruffle trim because I have been seeing ruffles everywhere. (back in October, when i was making costumes, i found this cool tutorial for sewing ruffles, read down to number 5.)

I really like how it turned out. Now, I think I'd like to make a table runner for the kitchen table. And maybe paint that table in the entry. White. Yeah.. we'll see.


I'm linking here today:

BCD


Tuesday, March 30, 2010

Crochet Hook Case


This gift was made for the occasion of my oldest's birthday. (Which was just yesterday!) She loves to crochet, and I thought it would be fitting for her to have her own tools. Most importantly, I felt she needed something pretty to hold those tools.


For those of you that love to crochet as well... the pattern is the Aluminum Crochet Hook Case. It was a relatively easy pattern to follow. I used cotton yarn that I already had. It holds ten crochet hooks, ranging in size from B to K.

(see some of my additional notes here and here.)

The gift also included a book, entitled Super-Cute Crochet: over 35 adorable animals and friends to make. I thought it would be fun for her to try making some cute little toys, while at the same time learn and practice following patterns.

Wednesday, March 10, 2010

Patchwork Project (part 2)

I feel like I must explain a little bit about this project...

I didn't mean to be suspenseful or sneaky when I didn't explain what I had in mind for this new quilt fabric. I was just a tad bit afraid that if I said what it was, then I would have to go through with it. I would be COMMITTED. And what if I just couldn't cut that quilt up? And what if I did cut it up, and I ruined it?
Well, I did go through with it. And I did cut it up...

I started out by making a pattern from the original seat. I traced it onto some fabric with a marker, leaving lots of room for error.
I cut the pattern out, sewed it together, and tested it out. Then I unpicked it, so I could trace it onto the quilt fabric.

And then with much trepidation, I cut into the quilt fabric. And then sewed and sewed and sewed on some bias tape. Ending up with this:

Now... just imagine... a tiny, newborn baby inside. She's coming soon! I can hardly wait.

Thursday, March 4, 2010

Knitted Bunnies

The thoughts behind for this project came from years of wanting some tangible thing in the hospital with my newborn baby.

I'd heard that keeping a little toy, cloth, or blanket next to the mother for a time would transfer her smell onto it, and could then be placed next to the baby. This would help to calm the baby because he or she could smell the mother close by.

I've wanted to try this for the last few of my children, but never have.
When I decided to start using materials I already have in the house, my thoughts turned to some cotton yarn nuggets and some wool batting. All leftovers from other projects. And all natural materials, perfect for attracting scent.
I thought this little bunny would be the perfect thing for our new baby girl. My hopes are that if I keep this little bunny next to me, she'll begin to smell like me, and then give some comfort to the baby when I'm not around.


At Christmastime, I came across this shop and blog by Rebecca Danger in my attempts to find cute items for handmade gifts. The patterns are at the top of the sidebar.

I also would like to mention another shop, SunflowerRadiantLove, that sells little dolls that would be perfect for the same use because she uses cotton for the faces and and wool for the stuffing. And most importantly because she is so kind in her comments to this blog!

LinkWithin

Related Posts with Thumbnails