Showing posts with label tutorial. Show all posts

Thursday, March 22, 2012

Mini Market Bag Tutorial

i thought it might be fun to make up a little tutorial for the little bag i made the other day. (i am by no means an expert seamstress or sewist.)

i just thought someone else might like to know how i made that little bag. so that they could share it with their own little sweetie!

let us begin!

you will need:
you will also need:

scissors
sewing machine
thread
an iron

place the 9 x 12 inch fabric in front of you.
fold down the top 1/2 inch on the short side of the fabric and press with an iron.

next, fold down the same edge an additional 1 1/2 inches. press.

place the ball trim underneath the folded edge. pin in place.

using the sewing machine, stitch the trim and the folded edge. also, stitch along the top fold.
repeat this for the other piece of 9 x 12 inch fabric.

the french seams

with wrong sides facing, pin both pieces of fabric together.
use a 1/4 inch seam allowance and stitch down one side, along the bottom, and up the other side.
snip the bottom corners.

turn the bag inside-out. press flat.

use a 1/2 inch seam allowance this time, and sew down one side, along the bottom, and up the other side.

note: this part is a little tricky for me to explain in writing. so look through the next 4 pictures BEFORE you stitch the corner triangles.

pinch the corners together. make sure to match up seams on the inside.


this is what it looks like on the inside. make sure to match up the seams.

stitch across the corner.

this is what it looks like after the corners have been stitched with the sewing machine.

turn the bag rightside-out.
this is how the bottom now looks.

the straps (follow these instructions for each piece of 4 x 16 inch fabric)

fold in half lengthwise. press with an iron.

next open up the fabric. then fold in one edge of the fabric to the center fold. press flat.
repeat for the other edge.
it should now look like this:

again, fold at the center fold and press.

stitch down both sides of the strap with a sewing machine.
now you're ready to attach the straps to the bag!
fold the strap end under 1 inch and pin to the bag.

repeat for the other strap end, giving a space of 3 1/2 inches between ends.

using the sewing machine, stitch the strap to the bag in a square.


snip all thread ends.
Voila! a handy-dandy mini market bag. just right for little hands.


Tuesday, January 24, 2012

Felt Feather Tutorial


i thought i would share how i made the feathers for the brave headband i made for the birthday powwow.

once made, the feathers can be used for all sorts of projects.

materials:

3-6 different colors of felt (i used light pink, dark pink, white, purple, dark gray)
scissors
sewing machine or needle and thread

for the solid color feather...
first, make a template out of scrap felt measuring 2.25 inches by 6.5 inches. (you can make your feather any size you want!)

next, place the template on the light pink felt and...

cut it out. (i didn't trace around the shape i just carefully cut around it.)

then  place the light pink felt shape onto the dark pink felt.

and cut around the felt shape again, leaving a small .25 inch border.

then take the two felt shapes to the sewing machine (or use a needle and thread). start at one end and...

sew toward the other end slowly and with a slight curve. about an inch before the other end, stop. leaving the needle in the felt, turn the felt around and sew back to the starting end.

to get a cute feather detail, cut out a few triangles on each side of the felt shape. make sure and only cut the little triangles out of the top piece of felt.

for the eagle feather...
 make two felt shapes just like above. one of white felt and one of purple felt.

take the white felt shape and place it on the gray piece of felt.

{the following two pictures would not upload correctly. both are turned sideways. i apologize.}
cut carefully around the white felt. this gray piece will be the feather tip.

now place this felt piece on top of the white felt.

pin the gray felt to the white felt. cut the bottom off at a very slight angle. (this is just a personal preference. i think it gives a little character.)

now, cut out the little triangle details on both sides of the felt feather shape.

sew the felt shapes together the same way as above. making sure to sew onto the gray felt piece.


and there you have it! FELT FEATHERS.


Monday, May 3, 2010

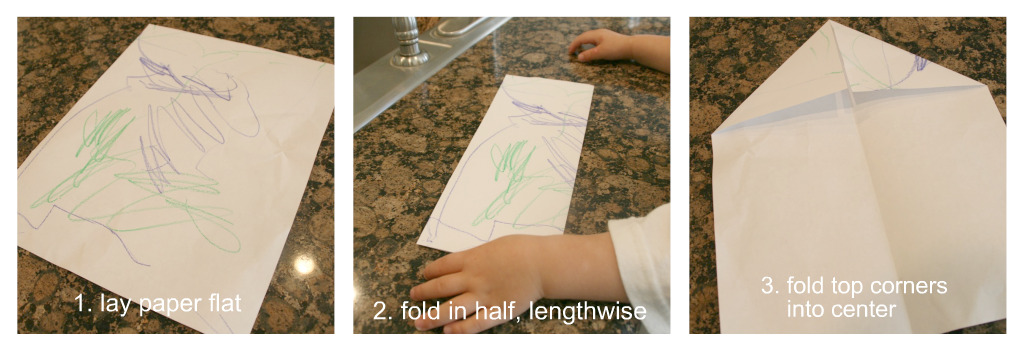
Paper Airplane Tutorial


When Isaac was little I checked a book out from the library on how to make paper airplanes. I never imagined that those ariplanes would become a such a part of our lives! Isaac still likes paper airplanes. Although now he can make his own. Right now, it's Asher's turn.
I know how to make two basic airplanes. I'm going to share my favorite one.


See that last picture? He crumpled it up in the time it took me to change a load of laundry from the washer to the dryer.

Tissue Paper Flower Tutorial

The birthday decorations have finally, FINALLY come down. They've been up since the end of March. MARCH. First for Aryn and then for Zoe. I have to admit though, I liked having them up. They're so pretty and added fun color to the kitchen.

These paper flowers are great decorations that can be used for so many different occasions... birthdays, baby showers, bridal showers, etc. They're very versatile, easy to make, and look beautiful!!

My mom has made them a lot for different things, so she came over and showed me how to make them. Let me show YOU how it's done...

You will need: tissue paper, scissors, garbage ties or wire, yarn.

You can use 6 or 8 sheets of tissue paper.
Decide on the size of flower you want. Small-cut the tissue paper in half. Medium-cut some of the top off. Large-use the full size.
Fold the paper back and forth into an accordion fan.
Cut the ends on both sides into either a rounded shape or a point (like the white).

Twist the garbage tie or wire around the middle of the accordion fan.

Very carefully, pull the sheets of tissue paper apart individually toward the wired center. Go slowly because the paper rips VERY easily. Make sure to do this to both sides.

Voila! A beautiful paper peony.
Make a bunch of different colors and sizes, tie on some yarn, and hang them from your ceiling. (I'm thinking of hanging ours back up in the girls' room.)

Note: this post was first published here by me under the title: paper peonies.

LinkWithin

Related Posts with Thumbnails